Close
Search

Enter the words or phrases you want to find

Blog

Finding MY Fitness Connection

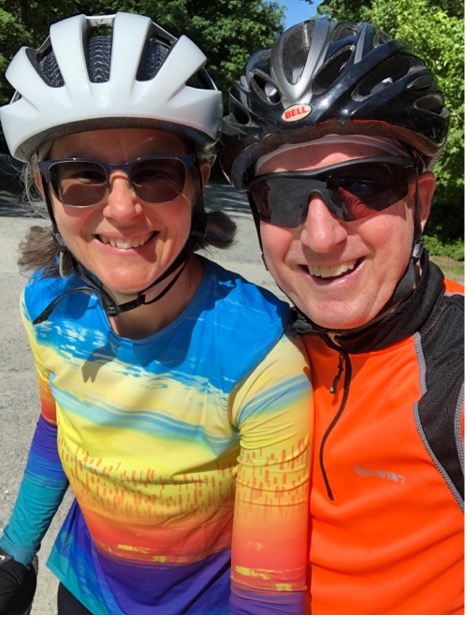
Last winter, when contemplating activities I could do with my husband, I came across bicycle tours. An internet search revealed a wide variety of tour companies offering bicycle tours all over the world. I have always wanted to see the New England fall foliage, so I signed us up for an October tour in rural Vermont. Once I paid the nonrefundable deposit, I knew I had to get more serious if I truly wanted to enjoy the experience.

My husband and I are blessed to live in an area that has so many well-maintained, beautiful, shaded greenways and rail-to-trail paths. I started out riding once a week and gradually increased the number of miles I rode each time. Then I started riding two times a week, then three times a week. Even in the heat of summer, riding before noon was still pleasant due to the shade cover on the trails. I have ridden in the sun, rain, and wind (with the wind being my least favorite). With the right gear, I am hoping to continue riding this winter. I have found cycling to be a great aerobic workout that is easy on the joints. Other benefits I have noticed since I started cycling include improved musculature, weight loss, decreased appetite, and no more achy knees.

On YouTube, there are so many videos highlighting wonderful bicycle trails all over the United States, including many in the region where we live. Now my husband and I enjoy planning regional trips that take us to wonderful trails and lovely small towns. We have met so many delightful people of all ages and abilities along the way. I really have found MY fitness connection!

Don’t miss another great blog: Subscribe Now

How to Avoid Gas when Eating Legumes and Beans

This issue is clearly one that many of you have an interest in. A blog posted in 2016 and updated in 2021, FIVE Ways to Avoid Gas with Beans, is one of our most read blogs. In fact, if you ask Google how to avoid gas with beans, the AI overview cites our blog.

When the blog was originally posted, I suggested going slow when introducing beans in your diet, soaking dried beans for at least 48 hours, cooking well, adding ajwain or episote, and eating slowly. Later, after some additional research, I posted a follow up suggesting using hing or asafoetida. Since that time, I have used hing exclusively when cooking any beans or legumes. My family, friends, and I can tell you that hing really works.

Hing is a spice of east Asian origin that smells very pungent- so much so that you may be hesitant to use it in food. Trust- it tastes good when cooked. It has a mild onion/garlic taste that goes great with beans and legumes. Hing inhibits the fermentation of the undigestible carbohydrate found in beans.  It is this fermentation in the gut that causes gas. It also relaxes the muscles in the intestine which reduces bloating.  Once this fermentation is stopped or at least slowed and the intestines are a bit relaxed, your body can handle the digestion of beans and legumes much easier. Thus, experiencing no, or greatly reduced, gas.

Now that we know about hing’s help in digestion, how do you use it? Below is a recipe that illustrates how hing can be used when cooking with canned beans. It is also the easiest and most delicious hummus ever. Hope you give it a try. You can get hing at most Asian markets or online.

White Bean Hummus

Ingredients

  • 2 cans white beans (you can also use garbanzo beans)
  • 1/2 teaspoon hing
  • 1/4 – 1/3  cup lemon juice
  • 2 Tablespoons olive oil
  • 1/2 cup tahini
  • Salt to taste

Directions

  1. Drain and rinse well the canned beans.
  2. Place in a medium pot and cover with fresh water (discard the water the beans can in).
  3. Add ½ teaspoon hing to the beans and cook on low heat for 30-45 minutes or until VERY soft.
  4. Drain beans reserving some of the cooking liquid.
  5. Place the drained beans, lemon juice, and olive oil in a food processor.
  6. Blend until very smooth adding cooking liquid as needed.
  7. Place the smooth bean mixture in a bowl and mix in the tahini.
  8. Adjust with additional lemon juice and salt.
  9. Serve with a drizzle of olive oil, pita triangles, and/or vegetables.

Nutrition Information

  • Serving size: ¼ cup
  • Calories: 141 calories
  • Fiber: 3 grams
  • Protein: 6 grams
  • Fat: 8 grams
  • Sodium: 57 grams (more if beans are not rinsed well or additional salt is added)

Don’t miss another great blog: Subscribe Now

Welcome Fall with this Beet Lentil Salad

It is not quite yet fall, however, the days are getting shorter and cooler so we know it’s coming. This salad is a great way to usher in the season. It is an interesting main dish and is super quick, thanks to using canned beets. You can also use roasted beets that you can sometimes find prepared and packaged in the produce section. It is a great use for leftover lentils or you can even use other beans. The star, to me, is the cumin vinaigrette.

Ingredients

  • 1 cup red, green, or brown lentils
  • 1 bag baby arugula
  • 1 can whole beets, drained
  • 2 ounces (approximately ⅓ cup) feta cheese, crumbled (can use blue cheese or goat cheese)

Cumin Vinaigrette:

  • ¼ cup olive oil
  • 1 shallot, minced
  • 1 teaspoon ground cumin
  • 2 tablespoons balsamic vinegar
  • 1 tablespoon lemon juice
  • Pinch cayenne
  • Salt and pepper to taste

Directions

  1. Make the vinaigrette by heating the oil in a medium skillet and sautéing the shallots.
  2. Add the cumin and cook 1 minute. Remove from heat and add the vinegar, lemon juice, cayenne, salt, and pepper.
  3. Divide the vinaigrette into 2 bowls to cool.
  4. In a large pot, cook the lentils until tender in salted water. Usually this will take between 15-40 minutes, depending on how soft you like the lentils. You can use vegetable or chicken stock instead of water for more flavor. 
  5. Drain the lentils and toss with ½ the vinaigrette.
  6. Toss the arugula in the other bowl with ½ the vinaigrette.
  7. Cut the beets in quarters and divide between 4 plates.
  8. Place ¼ of the arugula on each plate.
  9. Top with ¼ of the lentils.
  10. Divide the feta cheese between the plates.

Nutrition Information per Serving

  • Serving Size: 1 cup
  • Calories: 192 calories
  • Carbohydrates: 22 grams
  • Fiber: 7 grams
  • Protein: 9 grams
  • Fat: 9 grams
  • Sodium: 79 mg

Don’t miss another great blog: Subscribe Now

Best Popcorn Popper Ever for Healthy Popcorn

Popcorn is a great snack. Let me qualify that- some kinds of popcorn make a great snack. Movie theater popcorn or microwave popcorn is not what I am talking about. The popcorn itself is what makes it good, but the fats added to it – butter or other saturated fat – make it an unhealthy snack, not to mention all the salt. There are many types of premade popcorn, however finding one that is healthy is a challenge as they may be high in fat, salt, and other flavorings. It is also hard to keep fresh once you open a bag. 

There is a way, however, to take humble popcorn and make it a wonderful go-to snack. The popcorn popper I have found to solve this is a microwave silicone popcorn popper. You can find these online or most kitchen stores. These easy-to-use vessels allows for you to add just a bit of oil and other seasoning for a wonderful dish. They are easy to clean, BPA free, easy to store (thanks to their ability to collapse), non-breakable, and, best of all, eliminate unwanted saturated fat and chemical-lined microwave bags. Using this popcorn popper as opposed to prepared popcorn or microwave popcorn is also less expensive. You can buy popcorn kernels in a bag or jar. They are available in all grocery stores.

Simply place the popcorn kernels in with a small amount (or no) of oil and seasoning. The type of oil is up to you. I like olive oil as it adds flavor. If you want a neutral oil, you can use canola or grapeseed oil. You can, of course, use plain salt or you can experiment with dried dill, oregano, chili powder, or your favorite dried seasoning. Two tablespoons of popcorn kernels popped make about 3 cups and is about 100 calories. If you add ½ tablespoon of oil, you still have a calorie-friendly 150 calorie snack. 

Don’t miss another great blog: Subscribe Now

What is Revenge Bedtime Procrastination?

It’s the end of a long, busy day and you’re exhausted. You know you should go to bed, but…. just a few more tikoks and reels. Just a few more chapters. Just one more episode. It won’t make a difference. Before you know it, one, two, three hours have passed, and you’re gritting your teeth as you set your morning alarm, already dreading the zombie-like, irritated feeling you’ll experience upon waking after only a few hours of sleep. Why did I do this to myself? You lament. But you’re not alone. In fact, so many people engage in this self-sabotaging habit that it has been scientifically studied and given a name: Revenge Bedtime Procrastination. 

Revenge Bedtime Procrastination is the act of delaying sleep by participating in leisurely or enjoyable activities, generally with the awareness that what you are doing might have negative consequences. It often stems from having a long, stressful daytime schedule and a feeling of a lack of control over your time. In a sense, you are seeking “revenge” on your busy schedule by staying up late to finally do what you enjoy. 

Research shows that those who are procrastinators in general, struggle with self-control and time management, and/or have ADHD are more prone to Revenge Bedtime Procrastination. Additionally, a 2019 study found that women are twice as likely to engage in Revenge Bedtime Procrastination than men1. While there are many probable reasons for this, one likely stems from the societal gender equity gap in which women are often expected to bear more responsibility for housekeeping, child caregiving, parent caregiving, and entertaining than men— while also often working a paying job- leaving them little time to themselves.

Research also shows that the consequences of Revenge Bedtime Procrastination, leading to  consistent sleep deprivation, are worse than just feeling bad. Consistent sleep deprivation is associated with an increased risk of chronic health conditions such as obesity, type 2 diabetes, hypertension, heart disease, and decreased immune function 2.

So how do you put an end to this counterproductive habit? Here are a few tips:

  1. Address your daytime stress and/or the lack of enjoyable activities during your day. To start, some questions to ask yourself are: Are there times in the day when I procrastinate and delay important tasks, increasing stress? Can I incorporate more breaks into your day, such as a short walk? Can I practice quick stress-reduction techniques, such as meditation, stretching, or journaling? Is there anything I can take off my plate? Reducing daytime stress should be a first point of focus.
  2. Set a bedtime. Seems elementary, but many of us don’t have a real bedtime! We have a range of time that we like to be in bed by, but are not committed to a specific bedtime, or we have a time we like to get in bed by, but are still on phones or screens in bed. Set a bedtime that allows you to get 7-9 hours of sleep, and commit to having lights and screens off by that time.
  3. Give your phone a bedtime, too. Did you know you can restrict your access to certain apps on your phone? Find the settings that allow you to do so and automate restricting access to addicting apps at least 30 minutes before you want to go to bed. 
  4. Plan a small reward for yourself. Every time you achieve your goal of being in bed without screens by a certain time, keep track, and reward yourself. It can be as simple as having a calendar that you put gold star stickers on, or spraying your pillow with aromatherapy spray on the nights you get to bed on time. 

While not always easy, getting adequate sleep is crucial to our health and wellbeing. Avoiding Revenge Bedtime Procrastination is a way we can reduce stress on our bodies and increase self-care. 

Sources:

  1. Revenge bedtime procrastination: A plight of our times?
  2. Why Sleep Matters: Consequences of Sleep Deficiency

Don’t miss another great blog: Subscribe Now

The Only Gazpacho Recipe You Will Ever Need

When you tell someone what gazpacho is- cold tomato soup- you more than likely get a confused face or a “I’ll pass” response. However, the first time you taste gazpacho, a much different response is elicited. “Oh, wow, this is great,” is the most common I have encountered. Some gazpacho recipes are, in my humble opinion, too complicated for this very simple yet delicious dish. I have made it literally dozens of ways, but this pared down recipe is super easy and delicious. You can vary it by adding basil or different toppings. You do need a blender. Any blender will do. This is not something I usually say as I am addicted to my Vitamix, however, that much power for this is not mandatory. The recipe calls for sherry vinegar which is outstanding. if you don’t have this and don’t want to add it to your pantry (I highly suggest you do as it is great in salad dressing), you can substitute cider vinegar or white wine vinegar.

Easy Gazpacho Recipe

Ingredients

  • 2 pounds of tomatoes, any kind, even cherry tomatoes will work, cut in 2-inch pieces
  • 1 bell pepper, any color, seeds removed, cut into 2-inch pieces
  • 1 English cucumber, peeled, cut into 2-inch pieces
  • 1 Shallot, cut in quarters
  • ¾ t salt, more to taste
  • 1 T Sherry vinegar (or white wine vinegar)
  • 4 T olive oil

Directions

  1. Place the tomatoes, bell pepper, cucumber, and shallot in the blender.
  2. Blend on high until VERY smooth.
  3. Lower the blender speed to low and add the salt and vinegar.
  4. Keep the blender on low and drizzle in the olive oil.
  5. Taste and adjust seasoning.
  6. Serve topped with croutons, finely chopped herbs such as basil, sliced green olives, and/or a drizzle of olive oil. *Variation: Add ¼ cup fresh basil leaves with the vegetables and blend into the soup.

Don’t miss another great blog: Subscribe Now

Weight Training After 50: Non-negotiable!

It is common knowledge that we lose lean body mass (muscle) as we age. In your 20’s, 30’s, and maybe even 40’s, you can hold on to some muscle mass. After that, if you are not pushing back on the loss of lean tissue, it will leave you. This loss of muscle impacts our metabolism, balance, strength, and overall well-being. There is a solution to this change in body composition that, over age 50, is non-negotiable – LIFT WEIGHTS. Call it weight lifting, weight training, strength training, resistance training; it all means the same thing: using your muscle to lift a weight. The weight can be a dumbbell, barbell, plates on a machine, your body weight, or a resistance band.

Weight training is especially important for women, who start out with less lean body mass than men. Women are often worried they will get too muscular. This is a myth that continues, however, it is simply not true. Women who weight train will build muscle and tone, but will not build significant bulk.

Getting started on a strength-training routine can be confusing, scary, and so overwhelming, so you may want to just put it off. However, a good first step is choosing to join a gym. There are plenty of low-cost options available in most communities. If you are a member of a gym, ask if they can help you set up a weight-lifting routine. If you have the means, enlist the help of a trainer just for a few workouts to get a routine down. You can also get some simple equipment and do your routine at home.  Check out information online for beginning weight training Check out information online regarding the best beginning weight training exercises based on the equipment you have at home or at the gym.

Here are some tips:

  1. Aim to do 3 sets for each body part: chest, back, biceps, triceps, shoulders, legs.
  2. Do not train a body part on two consecutive days.
  3. Use strict form to make sure you are getting the most from each set.
  4. Train with intensity. You will not build or maintain muscle if you are not stressing the muscle. One of the biggest mistakes made by people over 50 who are starting a weight training program is they don’t use enough weight or work out with enough intensity to see results.

Don’t miss another great blog: Subscribe Now

Easy Cucumber Recipes

Cucumbers are one of my favorite vegetables. They are most always available, come in a variety of types, easy to add to salads and sandwiches, and are high in water. At 96% water, cucumbers are a great way to help with hydration and add crunch to dishes. English cucumbers (the long skinny ones usually wrapped in plastic) have small seeds making them a go to for cucumber chips and sandwiches. They are also available year round. Here are a few of my favorite uses for the humble cucumber:

  1. Put cucumber chips and citrus in your water for a spa-like subtle flavor. See the recipe here.
  2. Use cucumber slices for dips such as salsa or hummus.
  3. Add chopped cucumbers to yogurt for a savory yogurt dish. Check out the recipe here.
  4. Slice pickling cucumbers (the small bumpy ones) into ½ water ½ cider vinegar. Place ice cubes on top when serving.
  5. Use cucumber slices in sandwiches instead of or in addition to lettuce.
  6. Made a Yogurt Cucumber Sauce for topping grain bowls or used as a dip.
  7. Use cucumbers in salads such as Kachumber Salad, Cucumber Avocado Salad, Kim Chi-Inspired Cucumber Salad.
  8. A family favorite – don’t miss this one Apple Cucumber Slaw

Don’t miss another great blog: Subscribe Now

Ask the Dietitian: Bottled Salad Dressing

Ingredients: Canola Oil, Distilled Vinegar, Water, Parmesan Cheese (Pasteurized Part-Skim Milk, Cheese Cultures, Salt, Enzymes), Salt, Extra Virgin Olive Oil, Contains Less than 2% of Sugar, Garlic, *Red Bell Pepper, *Onion, *Spice, Basil, Xanthan Gum, Natural Flavor, Annato And Tumeric (color). *Dried. https://www.kensfoods.com/products/simply-vinaigrette-italian

I prefer to buy bottled salad dressing rather than make my own at home due to convenience, taste, and mouthfeel. The brand I currently purchase is Ken’s Simply Vinaigrette Italian. Since I work with Registered Dietitian Nutritionist (RDN) Kelly Nordby, I thought it would be interesting to get her thoughts on this commercially processed product.

Questions:

1. What are your thoughts on the ingredient list and the nutition facts label in this product?

Of the bottled salad dressings that I have seen, this ranks at the top of the list. There are no additives, added sugar or added starches. Additionally, this is made with canola oil, containing heart healthy fat, with only 1 gram of saturated fat out of the 13g of total fat. All of the ingredients are natural.

2. Canola oil is listed as the first ingredient and extra virgin olive oil is listed as the 6th ingredient. From a nutritional standpoint, is canola oil acceptable? Why do you think they primarily use canola oil instead of extra virgin olive oil?

Yes, canola oil is acceptable and is generally considered a “healthy” oil because it is very low in saturated fat and similar to olive oil, it is high in monounsaturated fat (63%). Canola oil also contains a significant level of polyunsaturated omega-3s, a heart healthy fat that has been shown to lower triglyceride levels. Canola oil or soybean oil is primarily used in bottled salad dressings vs. olive oil because these are less expensive and more readily available.

Source: https://nutritionsource.hsph.harvard.edu/2015/04/13/ask-the-expert-concerns-about-canola-oil/

3. Do you have any other thoughts you would like to share?

I am a huge proponent of making homemade salad dressing vs. buying bottled dressing because it is generally healthier, very inexpensive and easy to make. It is just an oil + acid (e.g., vinegar, lemon juice etc.) + spices. You can better control the ingredients, specifically, the amount of sodium and avoid the added sugar, both of which are higher in bottled dressings. For example, the sodium in this dressing is 280 mg/serving, which could be greatly reduced in homemade dressing. For great homemade salad dressing recipes, visit medinsteadofmeds.com and search ‘vinaigrette’.

Don’t miss another great blog: Subscribe Now

I Got Back on Track by Tracking: 10 Takeaways

I recently turned 50 and hit the realization that many of our participants realize… my metabolism is not what it used to be. For much of my adult life, I have been able to eat mainly healthy foods without paying close attention to my portions. I could eat some chocolate every day without having to worry about weight gain. And if my weight did go up, a few days of paying close attention would help things normalize. I have come to realize that I can no longer eat the portion sizes that I used to eat and need to eat more mindfully by making my meals last ~20 minutes. Additionally, I need to pay closer attention to how hungry and how full I am, trying to only eat at a 2-3 on the hunger and satiety scale and stopping at a 5-6. Where have I heard these strategies before? 🙂

Alas, I heeded my own advice that I give to my participants when asked what they should do when their weight is plateauing or they begin gaining and they don’t know why…I started tracking! Honestly, I have not consistently tracked my food intake in close to 10 years, perhaps longer. And ironically, to find the best tracking app, I went back and reviewed my own blog written in 2021 titled, Tracking Still Works, where I reviewed several different tracking apps. I chose MyNetDiary, the one with the green apple and tape measure around it. Formerly, I used MyFitnessPal with great success; however, participants shared that many of the previously free features were now only available in the premium version.

Here are my 10 Tracking Take-aways:

  1. The set-up was amazingly easy. I simply entered my sex, current weight, activity level and weight goals. This provided me with my calorie goal for the day, which I could select if this was adjusted when I exercised and burned calories or not. I like having the calories ‘deposited’ back into my account, so I selected this option.
  2. The food database is expansive and the units are very reasonable. I am able to easily find the foods that I typically eat in the database and if not, there is something similar. In the past, I found it difficult to be able to log in units that made sense for the food consumed. For example, if I eat a peach, I can just choose the size of the peach consumed, I do not have to guess the number of ounces. If I cut up my peach, I can choose how much I consumed in cups (or fractions thereof). If I wanted to use a food scale, I could enter grams or ounces.
  3. The scanning feature is free. For packaged foods, I can scan the barcode and the nutrition information is instantly accessible. I then just enter the quantity consumed. This feature has become a premium (paid) feature on MyFitnessPal.
  4. My usual foods and exercises are saved. Since I often eat leftovers for lunch and/or dinner, I typically eat the same foods for several days in a row. The app makes it very easy to just copy these same foods for subsequent days. Similarly, I tend to be active in the same way on most days and the app makes it very easy to pull up these same exercises, while still changing the duration or rate of intensity.
  5. Reminders can be set up. I find that it helps me to set text notifications to be reminded to log my meals and snacks at the times when I typically eat them. These can be turned off at any time.
  6. Daily analysis is available. Daily feedback about how I am working toward my weight loss or weight management goal, calories burned through exercise, fiber intake (including the food sources that day), healthy and unhealthy fat intake (including the foods that I ate containing these) and sodium intake (including the foods that I ate with
    high amounts) is provided. This is helpful to see what areas I need to work on or which substitutions I could be making.
  7. I am motivated to move more if I want an extra treat. I was very surprised at how motivated I am to stay within my calorie goal for the day. If I want an extra treat or my chocolate and there are not enough calories left for the day, I try to add some extra minutes to my exercise to account for this.
  8. Tracking has made me more mindful of my portion sizes. I now have a visual cue of how many calories I have remaining for the day, and therefore, I am more mindful of measuring my portions so that I can more accurately account for what I am eating.
  9. Tracking has encouraged me to slow down and enjoy my food. As a natural consequence of tracking, my portion sizes have decreased to keep within my calorie budget. Because I want to enjoy my smaller amounts of food a little longer, I have tried to slow down and really taste what I am eating.
  10. Tracking is much easier than I thought. I have to say that tracking is way easier than I thought it would be and I owe this greatly to the ease of the MyNetDiary app. The developers have done their homework to make the task of tracking as painless as possible, and even somewhat enjoyable.

Don’t miss another great blog: Subscribe Now